Winter is a magical season that brings snowflakes, hot chocolate, and cozy blankets. However, as much as we love winter, it can be a challenging season for our RVs. In order to protect our vehicles for extended periods of disuse, we winterize them. Among other things, winterizing your RV entails draining the plumbing system (both drain and supply) to avoid damage from freezing.
When winter comes to an end and the weather gets warmer, RV owners around look forward to the open road and the camping season. It’s time to dewinterize our RVs to get them ready for spring and summer adventures. In this blog post, we will guide you through the process of dewinterizing an RV, step by step.
Before starting the dewinterization process, it’s crucial to inspect your RV thoroughly. Check your RV for any signs of damage caused by winter weather, such as cracks in the roof or windows, damaged hoses, or frozen pipes. If you notice any damage, make sure to repair it before proceeding with the dewinterization process. Your RV insurance may help cover the costs of these repairs.
Your RV was likely stored for the colder months with nontoxic antifreeze in the water supply system.
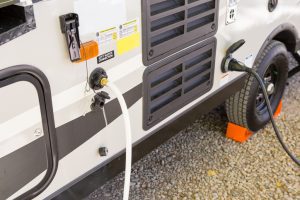
One of the most important tasks of dewinterizing an RV is to flush the antifreeze from the plumbing system. A good way to do this is to hook up a hose from a potable water source to the city water connector on your RV water system. Some people prefer to use their RV’s water pump instead.
After adding water to your freshwater tank, turn on the water pump (or turn on the potable water supply) and open all the faucets, including any showers and sinks, both indoor and outdoor, and any appliances hooked up to the water supply (like the washing machine). Flush the toilet several times to remove antifreeze from the toilet tank. Let the water run at least until clear water is coming out of each faucet or showerhead. Now you can turn off the pump and close the faucets.
If you have your water heater in bypass mode, it’s now safe to turn off bypass mode (otherwise complete Step 4 before doing anything else). At this point you can put back any filter cartridges that were removed for storage. Remember to let the hot water heater fill up completely before turning the unit on.
Now your grey and black water tanks contain antifreeze water, which should be dumped at an official dump site.
To sanitize the water system first close all drains and put back any drain plugs.
Mix a solution of one-quarter cup of bleach for every 15 gallons of water that your freshwater tank can hold. Pour the bleach into a bucket or container that holds 1-5 gallons and add at least a gallon of water. Pour the solution into the tank and fill the tank the rest of the way with potable water.
Turn on the water pump and let the solution run through the water lines. Open all the faucets, including the shower and toilet, until you smell bleach at each faucet. Do this for both hot and cold faucets. Then close the faucets and let the solution sit in the pipes for 3-12 hours.
Once the solution has sat, open all the drains and drain all the water from the system. Fill the fresh water tank and turn on your pump (or just use a hose like in step 2) and flush the system until you can no longer smell bleach at any tap or faucet.
If your water heater was not put into bypass mode for winter, you’ll need to drain and fill it before you can turn it on or replace any water filter cartridges.
To drain the hot water tank, make sure the unit is off and the water supply coming into the unit is off, too. Open the pressure relief valve, then slowly remove the drain plug. You will need a container to catch the antifreeze that comes out of the water heater. This antifreeze must be properly dumped–some people add it to their grey and black water tanks to dump later.
Once the tank is empty, close the valve, reinstall the drain plug, and turn on the water supply (and if applicable, the water pump) to refill the tank with freshwater. You probably want to wait until you are done sanitizing your water supply before turning your water heater on. At the very least, make sure the water heater tank is completely full before turning the unit on. Otherwise the tank can get damaged.
When you remove your drain plug, don’t forget to inspect your anode rod. Since your hot water heater has been off all winter, the rod should look roughly the same. If the rod is heavily corroded, it might be time to replace it.
After completing the above steps, it’s time to test the water system. Turn on the water pump and check for any leaks. Run the water in the faucets, shower, and toilet to ensure that the water is flowing correctly and there are no issues with the system.
Before using the propane system, make sure to inspect it thoroughly. Check for any leaks, damage, or loose connections. Test the propane system by lighting the stove and oven and checking for any issues.
Your propane tanks may also be expired–check the date on each tank.
The winter season can take a toll on the battery, so it’s essential to check it before using the RV. Inspect the battery for any damage, leaks, or corrosion. Test the battery by turning on the lights, radio, and other electrical components. If the battery is weak or not holding a charge, it’s time to replace it.
If you brought your batteries inside for storage, it’s less likely that your batteries will have any issues. While you’re under the hood, it’s a good idea to check the fluid levels, like coolant, brake fluid, power steering fluid, etc.
After sitting idle for several months, the tires may develop flat spots, lose air pressure, or become damaged. Inspect the tires for any damage or signs of wear and tear. Check the air pressure and inflate the tires to the recommended level.
After completing all the above steps, it’s time to clean the RV. Remove any covers, blankets, or tarps from the RV and wash it thoroughly. Clean the interior and exterior of the RV, including the floors, countertops, and furniture. Don’t forget to clean the windows and mirrors to ensure clear visibility while driving.
Check all the appliances in the RV, including the refrigerator, stove, microwave, and air conditioner. Turn on each appliance and make sure it’s functioning correctly. Check the filters and clean or replace them as needed.
If your appliances are malfunctioning, your RV warranty plan may help cover the repair costs–if you have a warranty. Most plans cover all the essential appliances and systems found within the coach, plus they cover the most common breakdowns your RV faces.
Now that your RV is dewinterized and ready to hit the road, it’s time to plan a trip. Decide on your destination and route, pack your belongings, and hit the road. Don’t forget to bring all the necessary supplies, such as bedding, towels, kitchen utensils, and toiletries.
Dewinterizing an RV is an essential step in getting it ready for spring and summer adventures. By following the steps outlined in this blog post, you can ensure that your RV is in tip-top shape for your next trip. Remember to inspect the RV for damage, drain and flush the water system, sanitize the tank, check the propane system, battery, and tires, clean the RV, check the appliances, and get ready to hit the road. Happy travels!